Magic Cookies: Elevating 7-Layer Bars to Chewy, Individual Treats
The aroma of freshly baked goods has a way of transporting us back to cherished memories, and few desserts evoke such a warm, nostalgic feeling as the classic 7-Layer Bar. Also known as Magic Cookie Bars or Hello Dolly Bars, these decadent squares are a guaranteed crowd-pleaser, boasting a symphony of sweet, chewy, and chocolaty goodness. But what if we told you this beloved treat could be made even *more* magical? Enter the individual Magic Cookie—a brilliant transformation that takes all the irresistible charm of the original and presents it in a perfectly portioned, wonderfully chewy, and delightfully crisp-edged cookie form. If you're searching for a standout
magic cookie recipe, you've found your next baking adventure.
The Irresistible Allure of the Individual Magic Cookie
For decades, 7-Layer Bars have graced dessert tables at potlucks, holiday gatherings, and family events. Their secret lies in an ingenious combination: a buttery graham cracker crust topped with layers of sweetened condensed milk, chocolate chips, flaked coconut, and chopped nuts, often with the addition of butterscotch chips. The result is a dessert that's rich, satisfying, and endlessly appealing.
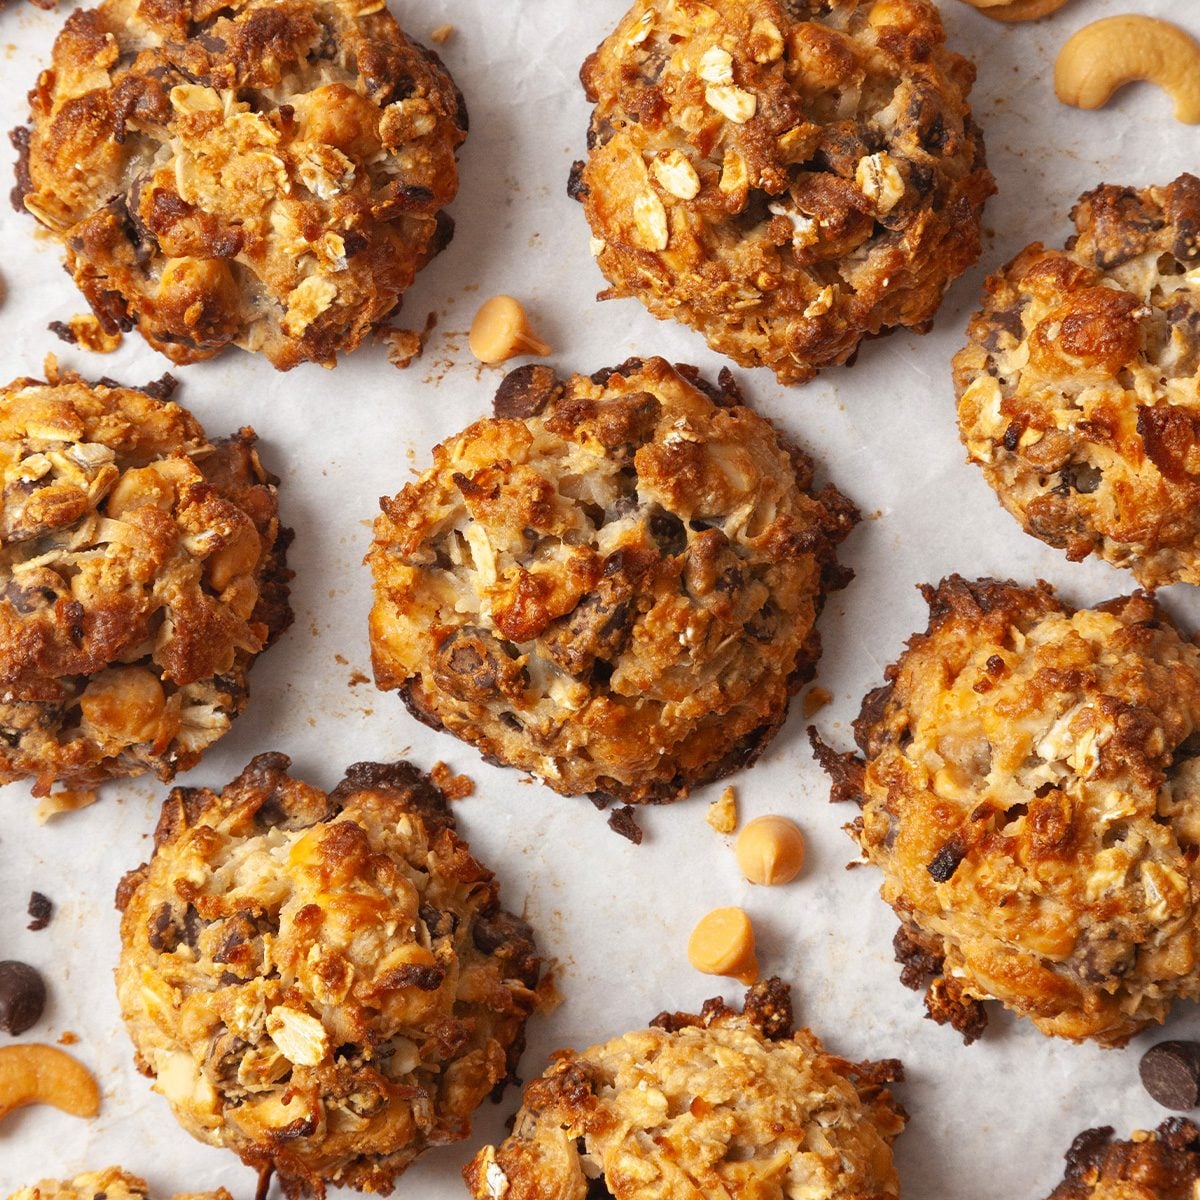
However, despite their universal appeal, bars can sometimes present minor challenges. Cutting perfect, uniform squares can be tricky, and serving them can sometimes lead to a slightly messy experience. This is where the innovation of the individual Magic Cookie truly shines. Imagine all the same delightful ingredients and the signature chewy texture, but instead of cutting from a pan, each treat is a self-contained mound of deliciousness, baked to golden perfection on a sheet pan.
The beauty of this transformation isn't just in convenience; it's in the enhanced sensory experience. Baking these as individual cookies allows for a greater surface area to caramelize, resulting in those coveted crisp, golden-brown edges that add an extra layer of texture and flavor. The centers remain wonderfully soft and gooey, mimicking the core experience of the bar, while the exterior offers a delightful crunch. This makes them not only easier to eat but also arguably even *more* satisfying. They’re an unexpected twist on a classic, making them a unique addition to any holiday cookie tray or an unforgettable treat to bring to friends and family.
Crafting Your Perfect Magic Cookie Recipe: Essential Ingredients & Savvy Tips
At its heart, a great
magic cookie recipe leverages the same foundational ingredients that make the traditional bars so beloved. The key is how these elements are combined and baked. You’ll find that the process is shockingly simple, often requiring just a handful of ingredients and minimal fuss.
Let's break down the core components you'll need:
*
Sweetened Condensed Milk: This is the "magic" binder that holds everything together, providing unparalleled richness, sweetness, and that signature chewy texture. Do not confuse it with evaporated milk; they are not interchangeable.
*
Chocolate Chips: Semi-sweet chocolate chips are the classic choice, offering a balanced sweetness that complements the other ingredients. However, this is an area ripe for customization!
*
Shredded Coconut: Flaked coconut, whether sweetened or unsweetened, adds a fantastic chewiness and tropical aroma that is quintessential to Magic Cookies.
*
Nuts: Chopped pecans, walnuts, or cashews provide a delightful crunch and nutty depth. A mix of nuts can also be a wonderful addition for varied textures.
* **Optional (but highly recommended):** Butterscotch chips are a popular addition in many 7-layer bar recipes, lending a distinct, buttery toffee-like flavor.
Unlike the traditional bar, where a graham cracker crust forms the base, the individual cookie version often integrates a similar flavor profile directly into the "dough" or omits it for a purer, chewy experience. Instead of spreading a mixture over a pre-pressed crust, you'll typically combine all the delightful toppings with the condensed milk and then scoop them into mounds directly onto a baking sheet. This streamlined approach eliminates a step and truly focuses on the delicious, gooey core.
Tips for Success:
1.
Parchment Paper is Your Best Friend: Line your baking sheets with parchment paper. This prevents sticking, ensures easy cleanup, and helps the cookies achieve those perfectly caramelized edges without burning.
2.
Scoop Uniformly: Use a cookie scoop to ensure even-sized cookies. This helps them bake consistently, preventing some from burning while others are undercooked.
3.
Don't Overcrowd the Pan: Leave enough space between each cookie mound. They will spread slightly, and adequate spacing promotes even baking and crispier edges.
4.
Bake Until Golden: Keep an eye on your cookies. They should be deeply golden brown around the edges, with a set yet still slightly soft center. Overbaking can lead to a dry cookie, while underbaking can make them too gooey to handle.
5.
Cool Completely: This is crucial! Magic cookies are very soft when warm. Allow them to cool *completely* on the baking sheet before attempting to move them. They will firm up as they cool, making them easier to handle and preventing them from falling apart.
For those looking for an even quicker solution or wanting to explore simple variations, check out our guide on
Easy Magic Cookies: 4-Ingredient Recipe & Holiday Twists. It's surprising how much flavor you can pack into so few ingredients!
Beyond the Basics: Customization, Serving, and Storage
The beauty of the
magic cookie recipe is its inherent versatility. While the classic combination is undeniably delicious, these cookies are a fantastic canvas for your creative impulses.
Exciting Flavor Twists:
*
Chip Swaps: Substitute a portion or all of the semi-sweet chocolate chips with butterscotch chips, white chocolate chips, peanut butter chips, or even dark chocolate chips for a richer flavor.
*
Candy Creations: For a burst of color and a different kind of sweetness, fold in plain candy-coated chocolate candies (like M&M's) or even mini marshmallows (add these in the last 5-10 minutes of baking to prevent them from melting completely).
*
Nutty Variations: Experiment with different nuts like macadamias, slivered almonds, or even roasted peanuts for unique textures and flavors. You can even lightly toast your nuts beforehand to deepen their flavor.
*
Fruity Additions: Dried cranberries, chopped dried apricots, or even candied orange peel can add a wonderful tang and chewiness, especially for holiday-themed cookies.
*
Spiced Surprises: A pinch of cinnamon, nutmeg, or even a touch of pumpkin pie spice can elevate the flavor profile, making them even more festive.
*
Toffee Bits: Stir in some toffee bits for an extra layer of buttery, caramelized crunch.
Serving Suggestions:
These individual Magic Cookies are perfect for virtually any occasion. Their grab-and-go nature makes them ideal for:
*
Potlucks and Picnics: No need for plates and forks; just pick one up and enjoy!
*
Holiday Cookie Exchanges: Their unique form makes them stand out on a platter of traditional Christmas cookies.
*
Gifting: Pack them in decorative boxes or bags for a thoughtful homemade present.
*
Lunchbox Treats: A delightful surprise for kids and adults alike.
*
Coffee or Tea Time: The perfect accompaniment to your favorite hot beverage.
For more inspiration on how these treats can be your go-to for social events, explore our insights on
Classic Magic Cookie Recipes: Your Go-To for Potlucks & Gatherings.
Storage and Freezing:
Good news for make-ahead bakers! Magic Cookies store exceptionally well.
*
Room Temperature: Keep them in an airtight container at room temperature for up to 3-4 days. Layer them between sheets of parchment paper to prevent sticking.
*
Refrigerator: For extended freshness, store them in an airtight container in the refrigerator for up to one week.
*
Freezing: Yes, Magic Cookies can be frozen! Once completely cooled, wrap them tightly in plastic wrap, then an additional layer of aluminum foil. They'll keep in the freezer for up to three months. Thaw them overnight in the refrigerator or at room temperature for an hour or two before serving.
Unleash the Magic in Your Kitchen
The evolution of the classic 7-Layer Bar into the individual Magic Cookie is a testament to the endless possibilities in baking. This brilliant adaptation delivers all the beloved flavors and textures in a more convenient, aesthetically pleasing, and texturally enhanced package. Whether you're a seasoned baker or just starting out, this
magic cookie recipe promises a straightforward process and undeniably delicious results. Prepare to amaze your friends, delight your family, and perhaps, keep a secret stash just for yourself. Dive into the magic and experience these irresistible chewy treats firsthand!